properties파일로 JUnit5 설정하기
우리가 그동안 살펴보았던 @Disabled, 인스턴스 라이프사이클, 테스트 이름 표기 등 Annotation으로 테스트를 제어 해왔지만, 이번 시간에는 properties파일로 테스트를 설정하고자 한다.
※본 글에선 intellij IDE로 실습한다
1. properties파일 생성하기
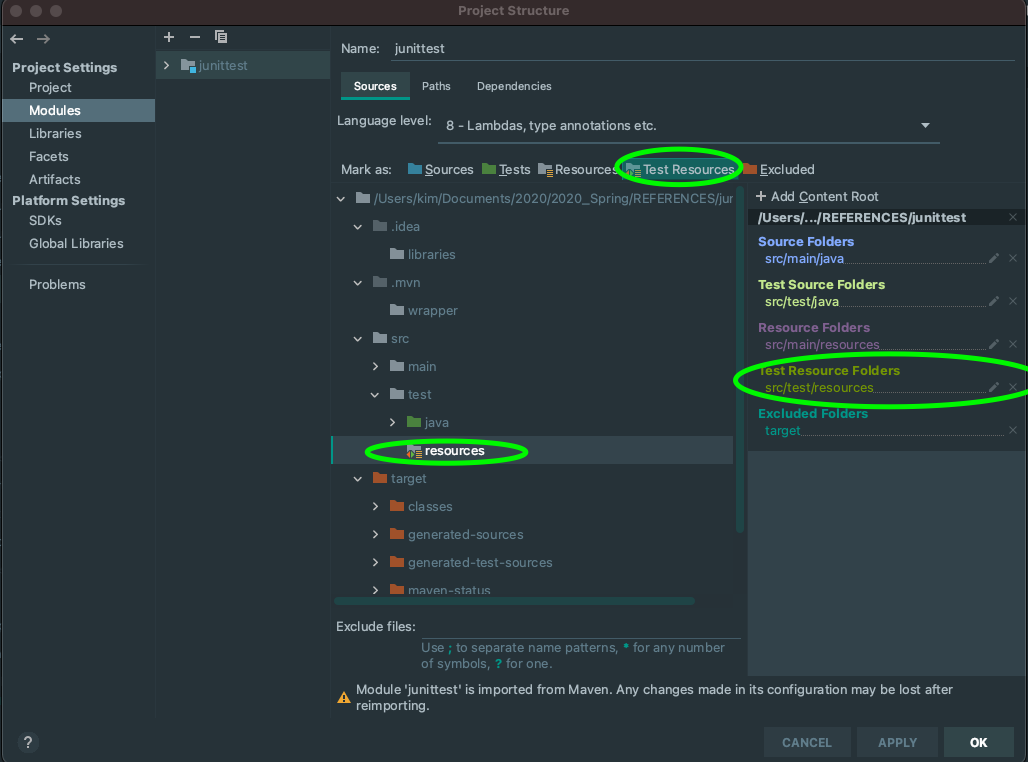
먼저 테스트 폴더에 resources 디렉토리를 만든후 junit-platform.properties이란 파일을 생성한다.

후에 Project structure -> Module에서 우리가 방금 만든 테스트 폴더를 Test Resources로 Class Path로 경로를 잡아준다.
2. 생성한 properties파일로, 모든 테스트 라이프 사이클을 클레스 인스턴스로 적용하기
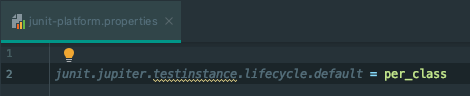
생성한 properties 파일에 다음과 같은 설정을 적어준다.
junit.jupiter.testinstance.lifecycle.default = per_class
package com.example.junittest;

import org.junit.jupiter.api.*;

@DisplayName("스터디 클레스")
class StudyTest {
    int value = 1;

    @Test
    @DisplayName("메서드 1️")
    @Order(2)
    void create_new_study_test() {
        System.out.println(value);
        value++;
        System.out.println(this);
    }

    @Test
    @DisplayName("메서드 2")
    @Order(1)
        //원격환경에서
    void create_again_study_test() {
        System.out.println(value);
        value++;
        System.out.println(this);
    }

    @BeforeAll
    static void beforeall() {
        System.out.println("BEFORE ALL");
    }

    @AfterAll
    static void afterall() {
        System.out.println("AFTER ALL");
    }
}
[결과]
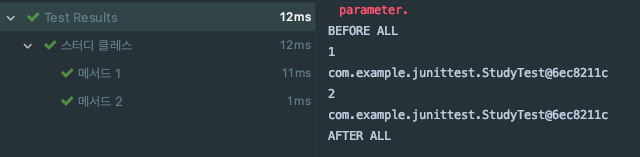
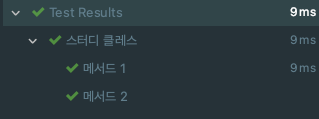
우리가 전 시간에 배웠던 @TestInstace LifeCycle를 통해 메소드마다 테스트 인스턴스를 컨트롤 했었다. 하지만 위에 소스코드와 같이
아무런 설정이 없어도 properties파일로 통해 lifecycle default값을 클래스로 주었기 때문에 공용으로 사용하는 value을 변환시켜도 각각의 메서드에서 그 변경된 값을 활용할 수 있게된다. -> Lifecycle이 Method인 경우 메소드마다 인스턴스를 따로 생성하기 때문에 원래는 value값을 다른 메소드(create_new_study_test)에서 1증가시켜도, 그 값이 다른 메소드(create_again_study_test)에선 value값이 1이였다.
3. properties파일에 @Disabled 어노테이션을 무시하고 테스트를 실행할 수 있는 설정.
-properties파일 변경전-
junit.jupiter.testinstance.lifecycle.default = per_classpackage com.example.junittest;
import org.junit.jupiter.api.*;
@DisplayName("스터디 클레스")
class StudyTest {
int value = 1;
@Test
@DisplayName("메서드 1️")
@Order(2)
void create_new_study_test() {
System.out.println(value);
value++;
System.out.println(this);
}
@Test
@Disabled
@DisplayName("메서드 2")
@Order(1)
//원격환경에서
void create_again_study_test() {
System.out.println(value);
value++;
System.out.println(this);
}
@BeforeAll
static void beforeall() {
System.out.println("BEFORE ALL");
}
@AfterAll
static void afterall() {
System.out.println("AFTER ALL");
}
}
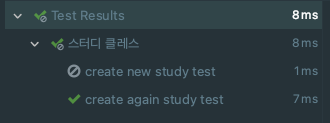
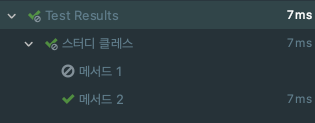
이러한 @disabled 어노테이션을 무시하고 실행하는 방법은 properties파일에 다음과 같은 설정해준다.
-변경후-
junit.jupiter.testinstance.lifecycle.default = per_class
junit.jupiter.conditions.deactivate = org.junit.*DisabledCondition
[결과]
또한 환경에따라 무시하는 DisabledonOS , JRE을 설정하고 싶으면 properties파일에 풀패키지 이름을 설정하면 된다.
junit.jupiter.testinstance.lifecycle.default = per_class
junit.jupiter.conditions.deactivate = org.junit.jupiter.api.condition.DisabledOnOsCondition
package com.example.junittest;

import org.junit.jupiter.api.*;
import org.junit.jupiter.api.condition.DisabledOnJre;
import org.junit.jupiter.api.condition.DisabledOnOs;
import org.junit.jupiter.api.condition.JRE;
import org.junit.jupiter.api.condition.OS;

@DisplayName("스터디 클레스")
class StudyTest {
    int value = 1;

    @Test
    @DisplayName("메서드 1️")
    @DisabledOnJre(JRE.JAVA_8)
    @Order(2)
    void create_new_study_test() {
        System.out.println(value);
        value++;
        System.out.println(this);
    }

    @Test
    @DisabledOnOs(OS.MAC)
    @DisplayName("메서드 2")
    @Order(1)
    void create_again_study_test() {
        System.out.println(value);
        value++;
        System.out.println(this);
    }

    @BeforeAll
    static void beforeall() {
        System.out.println("BEFORE ALL");
    }

    @AfterAll
    static void afterall() {
        System.out.println("AFTER ALL");
    }
}
참고로 필자는 JDK8, MAC을 사용하고 있다.
properties파일로 테스트이름 표기 전략 설정하기
package com.example.junittest;

import org.junit.jupiter.api.*;
import org.junit.jupiter.api.condition.DisabledOnJre;
import org.junit.jupiter.api.condition.DisabledOnOs;
import org.junit.jupiter.api.condition.JRE;
import org.junit.jupiter.api.condition.OS;

@DisplayNameGeneration(DisplayNameGenerator.ReplaceUnderscores.class)
@DisplayName("스터디 클레스")
class StudyTest {
    int value = 1;

    @Test
    @DisabledOnJre(JRE.JAVA_8)
    @Order(2)
    void create_new_study_test() {
        System.out.println(value);
        value++;
        System.out.println(this);
    }

    @Test
    @DisabledOnOs(OS.MAC)
    @Order(1)
    void create_again_study_test() {
        System.out.println(value);
        value++;
        System.out.println(this);
    }

    @BeforeAll
    static void beforeall() {
        System.out.println("BEFORE ALL");
    }

    @AfterAll
    static void afterall() {
        System.out.println("AFTER ALL");
    }
}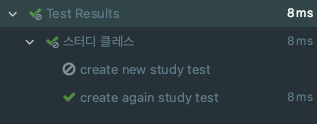
_(언더바) -> " "(공백)으로 테스트 이름을 바꾸어주는 전략인 @DisplayNameGeneration 어노테이션을 통해 바꾸어 주었다면 이 전략을 properties파일로 작성할 수 있다. 다음과 같이 properties파일에 작성해주자.
junit.jupiter.testinstance.lifecycle.default = per_class
junit.jupiter.conditions.deactivate = org.junit.jupiter.api.condition.DisabledOnOsCondition
junit.jupiter.displayname.generator.default = org.junit.jupiter.api.DisplayNameGenerator$ReplaceUnderscores
package com.example.junittest;
import org.junit.jupiter.api.*;
import org.junit.jupiter.api.condition.DisabledOnJre;
import org.junit.jupiter.api.condition.DisabledOnOs;
import org.junit.jupiter.api.condition.JRE;
import org.junit.jupiter.api.condition.OS;
@DisplayName("스터디 클레스")
class StudyTest {
int value = 1;
@Test
@DisabledOnJre(JRE.JAVA_8)
@Order(2)
void create_new_study_test() {
System.out.println(value);
value++;
System.out.println(this);
}
@Test
@DisabledOnOs(OS.MAC)
@Order(1)
void create_again_study_test() {
System.out.println(value);
value++;
System.out.println(this);
}
@BeforeAll
static void beforeall() {
System.out.println("BEFORE ALL");
}
@AfterAll
static void afterall() {
System.out.println("AFTER ALL");
}
}